JVC Player Guide
Index
Writen by Bitmask (bitmask (@) innernet.co.za)
Introduction
Many people still play VGA planets using the original Winplan client. It might have been nice when it came out if you compare to DOS planets, but since then many much better clients have been build. One of them is Java Vgaplanets Client (JVC) written by Lars Dam and some other contributors.
I have been playing with JVC for many years now and other player still using Winplan always state that they are comforatable with it, so they stick to it. Hopefully this guide will help some Winplan players to try JVC out and see all the things they have been missing all these years.
Please send me any comments you might have.
Copyright
Anyone is welcome to use, copy or publish this guide. If you do publish this guide, it would be nice to get a e-mail from you so that I can send you updates in future.
Acknowledgements
Thanks to Lars Dam for a great client.
Thanks to ][avok for a great site to play VGA Planets - Circus-Maximus is a great place to play.
Setup
You will need Java installed on your PC. The latest JVC require Java 1.6.
Download the latest version from the website and extract the archive in your Winplan folder. My Winplan is installed in c:\Planets and this is where JVC is also extracted. There are some sub folders that is part of the archive, like the Add-On folder.
Next you will need to create the images JVC uses. JVC uses GIF formated images. You can use any converter and comvert you c:\Planets\bmp folder contents to GIF. These images need to be placed in c:\Planets\images - You can download my ready made images from here
I strongly suggest you create a batch file to call JVC. My batch file is called c:\Planets\JVC.bat and contain the following:
"C:\Program Files\Java\jre6\bin\java" -Xms256m -Xmx512m -jar jvc.jarOnce you can open JVC, you need to create a new game in it. JVC store the game setup and history in a Database file that it creates in your game folder. The game folders can be any name, but I like the use the VPWork1-8 similar to Winplan, then I know any other apps I run will also find it. Go to File-> New Game, or File-> Game List -> New to create a new game. Type in the Game name and the Game folder similar to the picture below and click OK to create the game.

Game Properties
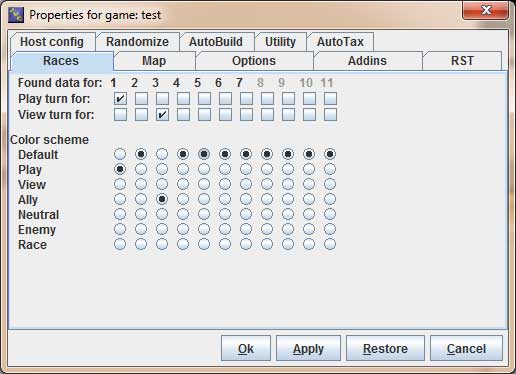
You will need to do some initial setup of each game in the Game properties window. The most important is to choose the Races. In this test game I have rst files for races 1-7 and I choose to play race 1 with race 3 as my ally so I will view that turn as well. I setup the color scheme to match this.
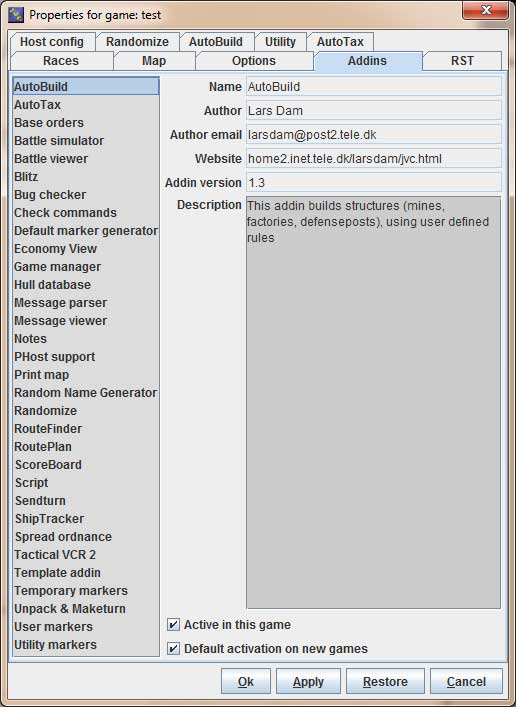
There are many add-ins that are bundled with JVC. Some give basic functionality that you must have while others are optional. Here are 2 options of interrest. You can set an add-in active for this game and also active by default for any new game (so you do not have to set it each time).
I have the following add-ins on by default for all games: AutoTax, AutoBuild, Base Orders, Battle Simulator, Battle Viewer, Default Marker generator, Game Manager, Hull Database, Message parser, Message Viewer, Random Name Generator, Randomize, Scoreboard, ShipTracker, Temporary Markers, Unpack & Maketurn, User Markers & Utility Markers. When playing a PHost game that add-in is a must use.
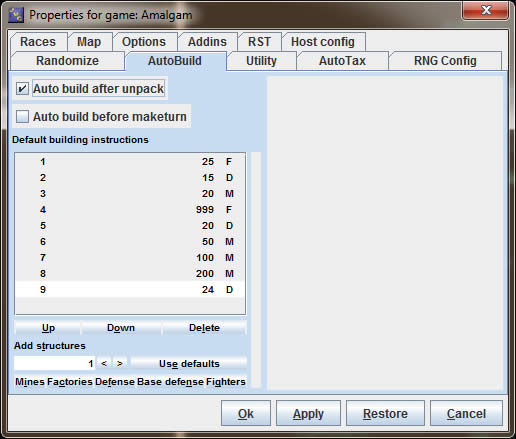
The Autobuild feature is second only to the RandMax-Echoview combination, but require less work if you do not need that detail builds. It works very well and save much time per turn. You can change your default setup the way you want which is applied to each planet automaticly. You can then change a planets values individual after that.
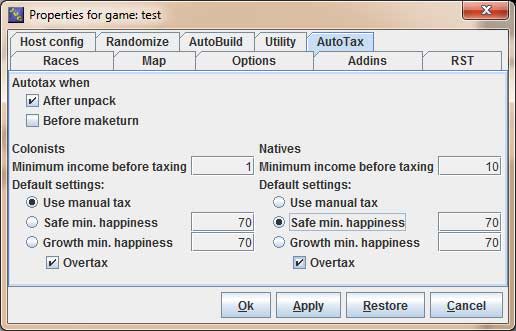
Autotax is similar to the Autobuild. These are the defaults that will be applied, but you can change it per planet.
For Randomize I only add any additional Freindly Codes that might be in playby game add-ons. The rest of the options are default, but you can look at it. Host Config will be auto populated by the Message Parser from your game config messages or if you are using PHost the pconfig.src file will be used.
JVC Properties
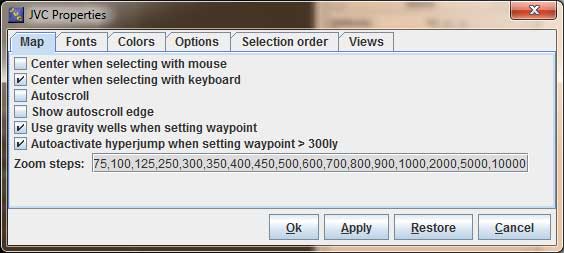
Something that you might want to look at initially is the JVC properties (File->JVC Properties). The Map, Options and View tabs are important. For Map I remove the Autoscroll and Show AutoScroll edge options.
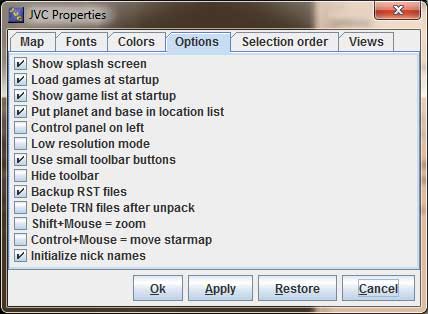
In the options menu you can set your preferences. Some options of interrest is the Low Resolution Mode which is very helpful on smaller/older monitors.
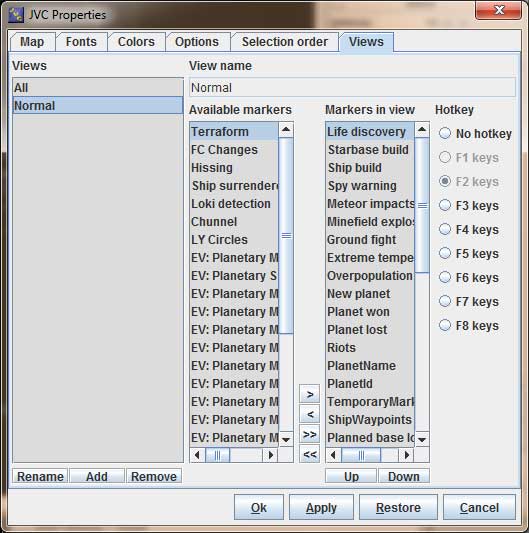
Your views are what will be displayed on your starmap. The "normal" view is what you will have by default. I created a "All" in which I basicly added all but a few markers as they clutter up my view. I also assigned Hotkeys to each view which you use with the Shift key (SHIFT-F1, SHIFT-F2, etc). You can create your own.
One change under properties that I would suggest is to make the Utility.PlanetName for the starmap size 10 instead of the default 12
Basic Gameplay
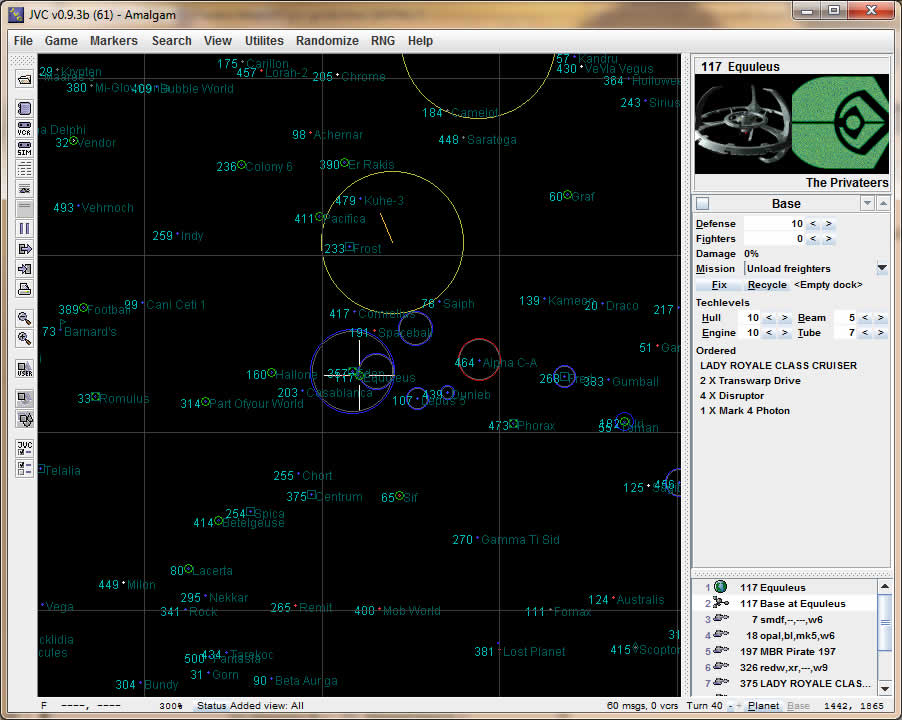
It the game view there 4 areas - the Menu, the Button Bar, the Starmap and the Control Panel on the right. The Button Bar and the Control Panel can be relocated, so they may not be in the same location on your screen.
The Button Bar
![]()
The Button bar has many of the same items that can also be found under the menu. I list them here from left to right.
- Open Game List - You can open another game from here. I suggest you close your current game first (File->Close game) before you open another game as the game database can grow large and slow JVC down.
- Show Messages - Here your can read and write in game messages. JVC parse messages for data to display on the starmap. Those parsed messages are hidden by default but you can view then if you want by changing the hidden option.
- VCR Player - I personally use PCC2's PlayVCR. Nothing comes close to it.
- Battle Sim - I use Tanacius Tool's Battle Sim, so cannot really comment on this one.
- Score - You should be familiar with this. It show a nice history graph similar to AScore in AutoTroll.
- Ship Tracker - This is a list of known ships and the last turn they were seen. Show will take you to the selected ship in the starmap. You can also filter per race and sort the columns.
- Base Orders - This show you a list of your Starbases and the orders and FC at each of those bases. Show will take you to the selected Starbase in the starmap.
- Hull Database - It show all the available hulls per race according to the shiplist you are using.
- Unpack - This unpack when you get a new rst file from your host.
- Maketurn - That makes the turn file for you to send to your host.
- Print Starmap - Print starmap if you want.
- Zoom In/Out - Use these or your mouse wheel to zoom the starmap. Zoom intervals are configurable in the JVC properties.
- User Markers - You can place your own parkers on the starmap. There are many colors and shapes and preconfigured ones to choose from. To delete, select the marker in the Control Panel en press the DEL button.
- Marker Type Selections - You can temporary hide/show markers on the starmap here. This can be refreshed to your View that you use or else it will stay active for the game you are busy with.
- View Selections - You can change your selected view.
- JVC Properties - JVC Properties
- Game Properties - Useful to adjust your defaults and other settings.
The Menu
![]()
The Menu bar and Button share many of the same features. File, Game and View options are all the same as what is on the Button Bar.
- File - The Close option here is very useful. Remember to Close the current game before you open another game. This is only an issue if you are only playing more than one game. The other File items are self explained.
- Markers - are temporary markers to help you visulise something. They are all very useful. Look at the Minefield marker to see how large a minefield will be. Once you do not want them displayed anymore, you need to clear the temp markers using that option.
- Seach - is useful to search for planets or ships on the starmap.
- Utilities - This is where the Autobuild/Tax are run. Both can be setup to run as the game is Unpacked or just before Maketurn, but it is often useful to change something (like dropping more clans from a freighter) and rerun run the Auto Build Planet or Auto Tax Planet for your current planet, or for all Planets. Later in the Control Panel for planets we will look at how to setup the Auto's.
- Randomize - is used for the Planet and Ship Friendly Codes as well as Ship Names. You can also set it up to run after Unpack or Maketurn but I always want to see what the FC was and will be so I run it manually every other turn (More frequent if you have a Bird next to you).
- RNG - is used for the Hull Names. Hull names take your hull and equipment and create a Nick for your ship from it. JVC has 2 sets of names for ships. Name is the name that other players will be able to see, while Nick is your own internal name.
- Help -> Add-in help - has some useful help under some add-ins. The normal help also list the keyboard shortcut list that is very useful.
The Starmap
The starmap work by selecting items/positions on the map. You can do this with the mouse or with the keyboard (ALT-Arrows). Once an item is selected at a position you will see more information about it in the Control Panel. Most items that are not a single point is selected by the center of the symbol of that element. You can also pan the starmap left/right/up/down by using CTRL+arrow keys.
Lets see what the starmap tell you (colors and symbols are the default, but can be changed by the user):
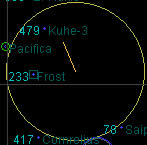 Ion storms are displayed as yellow circle with a line from the center indicating the predicted direction and distance of movement in the next turn.

 Minefields are also circles. Your own mines are displayed in blue, allies are yellow and enemies are red. You will notice that minefields have a grey inner circle. This is the predicted minefield size for the next turn because of decay and mine sweeps. Any ships in sweep range and with sweep mission will influence the decayed field.

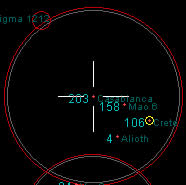
 Ships are displayed either as dots when in space or small circles when over a planet. Your own ships are green, allied are yellow and enemy are red. If you add the ShipWaypoint to your view, you will see the predicted waypoint of your enemy ships as well as your own. This is nice if you want to do a cloaked intercept for instance and the enemy is traveling in a line.
- + and - go back and forward in your turns, but you cannot go forward past the current turn. This gives you a history of what was done.
The Control Panel
The control panel is where you will play most of your game. The panel has a detail view at the top and an item list at the bottom.
Item List
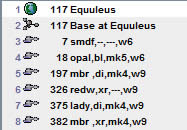
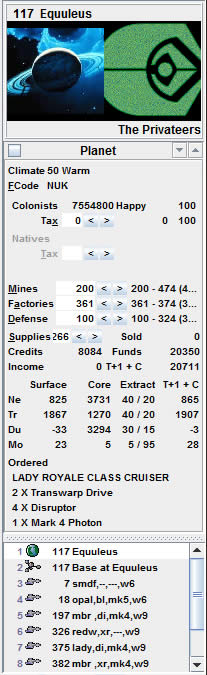
- The Item list at the bottom will list all items at the current position selected on your starmap. Changing you selection here will change to the detail view of the selected item. You can click on the item or use the up/down arrow keys to change the selection. Items that will be in the list here are planets, starbase, ships, minefield and planet messages/allerts. Each item type will have different options displayed in the detail view and depending on the add-ons in use you will have more panels per item available. In this example you see a planet, starbase and 6 ships.
- The ships will display their Nick if used, else the Name will be displayed. These ship names are the default values created by the RND ship name generator.
- When you have selected an item, you can move to the next known/owned of that same item type by using the left/right arrow keys. So pressing the left arrow while on a planet will move to the next planet with a lower ID, right to a higher ID. The same for Starbase and ships, etc.
Detail View
The Detail view for Planets are like the example on the left here. Lets walk through each part at a time from the top.
![]() This tell you the item type in the center.
This tell you the item type in the center.
On the left is a tick box that you can use to tag the item. Tag indicate you have played this item this turn. This is very useful to keep track of what you still need to do (When you finished orders for an item mark it with a tick), but it will be reset when you close down the game (the status is not saved). When using the left/right arrows to move to the next item this can also be useful. By pressing SHIFT-Right Arrow you will skip all tagged items and go to the next known untagged item. Once SHIFT+arrow does not move to the next item then you know you have finished orders for all items of that type. Doing this for Planets, Ships and Starbases cover your complete turn.
The up/down buttons will move between the tabs for that item if there are. For planets I have the Auto Build and Auto Tax tabs. More on those later.
Planets
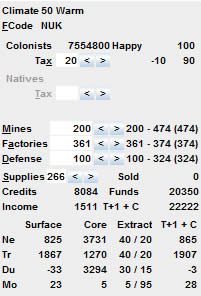
For Planets the next part show the climate, Friendly Code, colonist and Native details. You can also change the FC and the tax here if you like. For both the native and colonist tax you will see the current happiness on the right and under that the happines of the next turn from the tax rate that you set. The up/down movement is also displayed.
Next is the Mines, Factories & Defense values. You can buy more/less by clicking on the left/right icons or typeing in the textbox. To the right are 3 values Min - Max (Clan limit). Min is the starting value this turn, Max is the limit that you can buy from your available supplies/MC and Clan limit is the limit from your colonist population. Below that supplies can also be sold/(unsold only in this current turn) for MC.
Funds are Supplies + Credits. Income is what you will get next turn from your current tax rates and T+1+C is the Funds value you will have next turn. I'll be looking into the mineral desities, extraction, etc. in the Auto Build section. Please read it there.
- A note on selling/buying - There are some very useful shortcuts to buy more than one item at a time:
- left/right icon click will sell/buy 1 at a time
- CTRL+ left/right click will sell/buy 10
- ALT+ left/right click will sell/buy 100
- SHIFT+ left/right click will sell/buy the Max/All
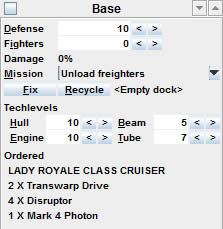
Starbase
The Starbase Detail view has 3 panels. Base, Build Ship and Parts. The Parts tab show nice info, but it does nothing extra that the other 2 panels do not do already, so I will not be discussing Parts.
Base is an overview. This is also the place to change your Defence, Fighters, Mission and Fix/Receycle options. The Tech levels will be upgraded automaticaly when you buy an item of that tech level, so you do not need to manually change them.
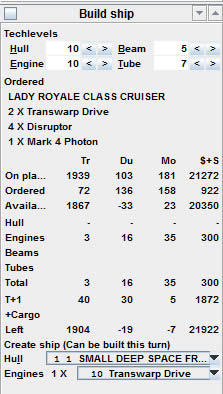
Build ship is where you will spend time each turn. Here you build a ship. At the bottom you can select the Hull, Engines, Beam Types and Count as well as Torpedo Type and Count if available.
Just above the Ship options you will see the available minerals and funds as well as the ship costs in those minerals and funds. The cost is broken down into each part so that you can see where the cost is going to.
T+1 are the minerals/funds you will have next turn. +Cargo is any ship cargo that will arive next turn. Left is your vlaues if you build the same ship next turnl. Any negative there indicate you have a shortfal and will need to make other plans. All this is nice to be able to see if you can build another ship next turn. It's good for all those detail future planners out there :)
The Create ship lable will tell you if the ship you are building can be built this turn or not. It is important to keep an eye on this lable. You might have ordered a ship, but it can't be build this turn. So Ordered details will show the ship, but next turn it will not be there. Only when you have enough resources will your ship be build. Also note that your build will automaticly be repeated next turn without you having to come back to it. If you do not want to build it next turn, just change it then. JVC only buy the parts you need when you need it so nothing is wasted, except if you buy parts manually yourself. As long as you do not buy parts in the Parts tab you will be safe and JVC will manage it for you.
Ships
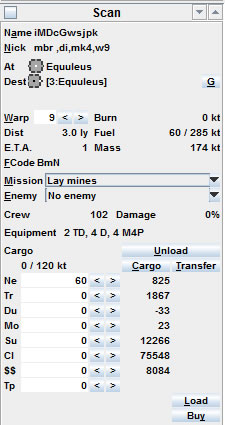
The Ship Name is what all other players and the host program will see, while Nick is your own internal name for the ship. Nick never leave your client and does not get sent with your trn file.
At and Dest is your current location and destination. The G button for the gravity well. By default JVC will move your ship using the gravity well, thus saving you a few Kt of fuel. If you want to go to a spesific X,Y and not use the Gravity well, press the G before you set the destination. For example 1Ly Warp 1 movement inside the gravity well you will have to do this, or if you want to run out of fuel inside the gravity well.
The next part show your speed, fuel capacity, burn and related fields. Use this to optimise what you want to do. Disabling the gravity well movement will change your burn rate if you want to see the influence.
Next is your FC, Mission and Enemy settings. Nothing funny here except that special Freindly Codes will be indicated with a label of what it will do. This is very handy for new players (and old).
Unload will unload all resources except fuel or weapons. Unload has one bug to make a note off. Once you click the unload, your arrow keys will not work on your Item List anymore until you press somewhere else with the mouse. I have the habbit of always pressing Unload and then after that Cargo so that the bug is bypassed.
To load/transfer resources you first need to indicate if it will be between ships (Transfer) or between a planet (Cargo). Transfer is only available when other ships are at the location. Cargo will jetison if in space or transfer to planet if in orbit, but you still have to press Cargo even if to ship transfers are available.
Torpedo and Fighters are handled special. You can transfer Torps & Fighters like normal between ships if the ships both have the same torp types or both have fighter bays. Similar you can also load/unload torps & fighters to the starbase if there are stock available, but you can buy them directly using the Buy button. Load will add the minerals and credits you need to build torps/fighters in space and will also set your friendly code automaticly to the correct FC. Naturally for fighters it will only work if you have that race ability.
Extras
Auto Build
The Autobuild addon as I mentioned in the setup part is a great tool. You will find it as one of the control panel tabs for planets. Auto build show you the manual Mines, Factories & Defense build options.
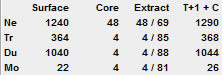
In this part (which is also in the normal Planet tab) there are 2 colomns that you might not already be familiar with. Extract has 2 values per mineral. The right side is the density that you will know from other planets clients, while the left side is the actual Kt value that will be extracted from the planet core next turn given the mines that are on this planet. The T+1 Column again show you what your stocks will be next turn (surface + extracted). With this information you can optimise your mines that you need to build.
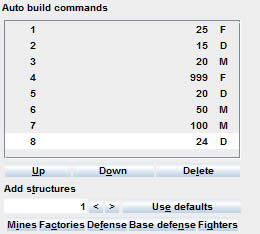
The actual autobuild values are unique to this screen and the AutoBuild Add-on Property screen. Here you set up the order, amount and type of builds you want to automaticly get done. Each planet will inherit the default values you set up initially. The better your initial setup the less work you have to do per planet. Lets look at the example above. The priority is from top to bottom and will be build while you have credits and supplies left to use. So Auto build will build 25 Factories, then 15 Defence, then 20 Mines, then Max Factories (999), etc. The limits from the amount of colonist will still apply, so auto build will only build what it can. An important thing to remember is that Autobuild will still build the next item in the build order if the higher priority item cannot be built. What do I mean? Factories are the cheapest items to build (1 supply, 3 credits) so they will always be build, but Defences are more expensive than Mines (1 Supply + 10 Credits vs. 1 Supply + 4 Credits), so even if we cannot build 1 more Defence there might be enough funds to build 1 or 2 Mines. Similar if Mines was before Factories you could sometimes have a factory build before your Mine Rule is satisfied. This has advantages and disadvantages, so keep that in mind.
A tip on what I do. I setup my Auto Build defaults similar to the screenshot of it in the Game Properties section above. It has Mines in intervals of 50s or how ever I like it. going from small to large in priority. When I go to each planet, the defaults with all the values are applied. I then only delete those items I do not want instead of having to add new items each time. So for planets with low densities, bad temp or low minerals I delete all the mine building rules above 50, so only 50 will be build. If it is a good planet I leave everything there so 200 mines will be build. Adjust this to your playing style.
Another tip is this: Remember those Tags on the top left corner of the detail view? Well with Auto Build (and Auto Tax as well) they get saved. This is extreamly useful as you now have to setup your Auto build/tax for a planet only once, tag it and it will remember all your settings. If you now go to the Auto Build (or Auto Tax) screen every other turn and use the SHIFT left/right arrow keys only those planets who's Auto Build (Auto Tax) have not been reviewed will be returned and you only need to check those. This is a great time saver and along with the Auto build features will save you 30 - 60 min per turn in the later part of the game.
NB! It is very important to delete your Autobuild command for your Homeworld the very first turn that you play with them. The homeworld has lots of credits and the rules will waste them setting you back in those early turns when you need the buy tech levels or something else. I never use Auto build rules on my Homeworld other that Factory building.
Auto Tax
Auto Tax work very similar to Auto Build, but with much less features and even less need to check/review the values. The options are the same for Colonist and Natives, so I will only look at the one.
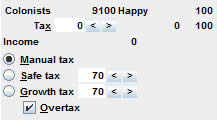
The same as with Auto Build, the default values from the game are copied to each planet on the first turn you own that planet in this game. If you setup the defaults well, you will have little need to adjust/review them for each planet.
My defaults normally are for Manual or Growth Tax for Colonist and Safe or Growth Tax for Natives. Not much need adjustment from the defaults except perhaps your Homeworld depending on your default colonist tax that you set up. The same tips apply as for Auto Builds.
The only thing you now need to do is not miss a turn :)
Enjoy the game!